Strategies for Pinpointing Location of Roof Leaks
The next step in the process is to visit the rooftop and pinpoint the leak's location. Using the interior measurement obtained previously, the inspector can locate the corresponding area on the roof.
Once the general location is identified, it is time to start looking for the water's specific exterior entry point. Before starting this process, two principles about roof leaks will come in handy.
First, water flows downhill. The inspector needs to look up slope from the leak's exit location. These observations should extend up slopes to ridges, walls and edges.
Second, water runs along the ribs of metal decks, so the inspector needs to determine the deck's orientation. It is important to thoroughly check seams and flashings in and around the leak's location.
The inspector also should determine anything that might have changed on the rooftop since the leak developed. For example, if rooftop activities have occurred in the area, it is possible that traffic caused or contributed to the leak's formation.
The inspector also should be aware that negative interior air pressure can draw moisture into a building. This fact is important when the leak occurs in or around a rooftop unit, perimeter wall, or penthouse.
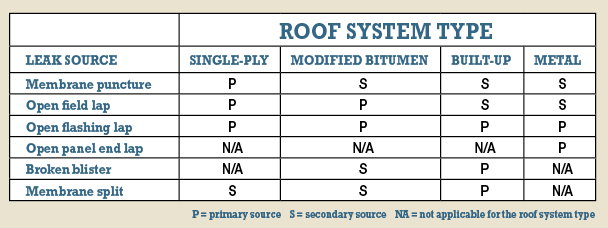
When investigating a roof leak after a rain or heavy dew, it is important to understand that the area around a puncture tends to stay wet slightly longer than the surrounding roof membrane. In situations such as these, the inspector must be sure to look for the wet spot. The table below identifies the most probable sources of roof leaks by system type.

Download larger PDF
Related Topics:


